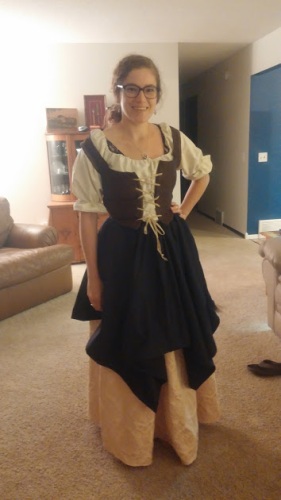
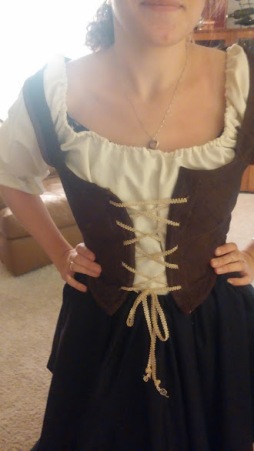
The costume is officially done, folks! For this last sewing session, I went back to Ashley’s, where we put the finishing touches on my outfit.
We ran short on both time and bias tape last session, so I didn’t quite get that part of the vest done — this time, however, I finished it up, and I’m really proud of it! I was expecting this part to be a lot harder than it turned out to be, and while it’s not perfect, I’d say it’s pretty darn good for a first-timer.
There was a small crisis when I realized that I’d somehow picked the wrong shade of brown when I bought my second package of bias tape, even though the number on the package was exactly the same…grumblegrumblegrumble. So I took off the bias tape I’d sewn onto one of the arm holes (I knew I wouldn’t get out of this without a little seam-ripping…) and sewed the lighter colored bias tape to both armholes, so that at least the parts with the other shade match each other and I don’t have one rogue armhole that’s two shades lighter than everything else. The end result looks a tiny bit goofy, but thankfully it’s not very noticeable when the vest is worn, so I’m over it.
While I was finishing up the vest, Ashley took care of hemming the two skirts — the underskirt actually ended up being the perfect length and not too short at all, despite my fabric-cutting goofs! There’s even room for a bum roll, if I ever get to that…we shall see.
Ashley also finished up the sleeves of the tunic, and it looks fantastic! Though I’ve been learning a lot, I was happy to leave this piece in Ashley’s capable hands, since I wasn’t yet feeling quite prepared to create the cinch-y neckline and sleeve closures for it.
The last order of business was to add a little boning to the vest and create the holes to thread the cording through. Per Ashley’s advice (and partially due to our dwindling time), we decided to just put boning along the front edges of the vest to stabilize it — in Ashley’s experience, stays have a tendency to become stabby and uncomfortable very quickly, and they’d have been awfully putzy to put in at this stage, so since the fabric is already pretty stiff, we figured that less is more in this case.
After putting the boning in the front of the vest, we decided we’d use the buttonhole method for the cording. Under the circumstances, this was the most expedient and hopefully the most durable option. Ashley created some beautiful buttonholes with the fancy buttonhole foot on her sewing machine (again, I left this part to the expert, but it was pretty fascinating to watch!), and after threading the cording through them, the costume was complete!
And here I am in my finished garb (ignore the fact that you can see my shirt underneath…and the horrendous hair day I seem to be having…it was a leeeeeetle humid that day)! I’m really happy with how it turned out, and I can’t wait to wear it at the Ren Fest! Next time you see me in this outfit, it’ll be against a backdrop of jousts, mead stands, mermaid lagoons, and lots of anachronistically dressed Minnesotans. Huzzah!

